Installation & Setup
Hummingbot Gateway is an API/CLI client that exposes standardized REST endpoints to interact with blockchain networks and decentralized exchanges (DEXs). It provides a language-agnostic approach to interacting with these protocols through a unified interface.
New: Manage Gateway via Hummingbot API
If you installed Hummingbot using the Condor Quickstart, you can manage Gateway directly through the API - no separate installation needed!
The Hummingbot API includes the manage_gateway_container tool that handles Gateway lifecycle:
- Start Gateway: Via MCP with "Start Gateway in development mode with passphrase 'admin'"
- Check Status: "Check Gateway status"
- Restart/Stop: Manage Gateway without manual Docker commands
See the Hummingbot API documentation for more details on Gateway management through the API.
The methods below are for standalone Gateway installation (without Hummingbot API).
There are two main ways to install Gateway standalone:
- Docker Installation (Recommended for most users)
- Source Installation (For developers and advanced users)
Install with Docker
This assumes that you want to use Gateway alongside Hummingbot to enable DEX trading. The Docker process enables seamless communication between the two services.
1 - Navigate to your Hummingbot directory
2 - Edit docker-compose.yml and uncomment the Gateway-related lines:
  gateway:
   restart: always
   container_name: gateway
   image: hummingbot/gateway:latest
   ports:
     - "15888:15888"
   volumes:
     - "./gateway-files/conf:/home/gateway/conf"
     - "./gateway-files/logs:/home/gateway/logs"
     - "./certs:/home/gateway/certs"
   environment:
     - GATEWAY_PASSPHRASE=admin
     - DEV=true
3 - Start both services
docker compose up -d

[+] Running 3/3
 ✔ Network hummingbot_default  Created                                                                                                                                              0.0s
 ✔ Container hummingbot        Started                                                                                                                                              0.2s
 ✔ Container gateway           Started
4 - Attach to Hummingbot
After setting your password, you should see Gateway: 🟢 ONLINE in the upper right corner.
Note
By default, Gateway runs in development mode (DEV=true) which uses HTTP for easier setup. For production environments requiring HTTPS, set DEV=false and ensure certificates are properly configured.
Install from Source
You can install Gateway on a standalone basis and then link it to Hummingbot manually. These instructions assume that you have already installed Hummingbot on the machine where you are installing Gateway, either from source or via Docker. See Installation for how to install Hummingbot.
Install Prerequisites
Install the following dependencies:
Tip
The new version of Gateway uses pnpm instead of npm because it efficiently handles dependencies with a disk space-saving approach. Since Gateway imports multiple libraries with redundant dependencies, pnpm creates a single content-addressable storage for all packages, significantly reducing installation size and improving performance.
From CLI:
First, install NodeJS 20+ using the sudo administrator prefix:
# For Ubuntu 20+
sudo apt update && sudo apt install -y curl
curl -fsSL https://deb.nodesource.com/setup_20.x | sudo -E bash -
sudo apt install -y nodejs
Afterwards, install pnpm:
Install and Setup Gateway
-
Clone the Gateway repo and navigate into the folder:
-
Install and build Javascript dependencies defined in
package.json:
Run Setup Script
The gateway-setup.sh script, located in the root Gateway directory, copies the default Gateway configuration files from /src/templates to /conf/ folder.
Run the script:
The script will prompt you to select which configurations to update:
server.yml- Gateway server configurationchains/- Chain and network configurationsconnectors/- DEX connector configurationstokens/- Token lists for each chain/networkpools/- Pool lists for each DEX connector
For a fresh installation, select all options. The script will preserve any existing wallet configurations and defaultWallet settings.
Optional: Generate Certificates
Note
Certificate generation is optional. By default, Gateway runs in development mode (HTTP) which doesn't require certificates. You only need certificates if you want to run Gateway in production mode (HTTPS).
If you want to enable HTTPS mode for secure communication:
- Start your Hummingbot client and run
gateway generate-certs - Enter a secure passphrase when prompted
- Note the certs_path where certificates are stored
- When running
pnpm run setup, choose to link certificates and provide the path
To connect Hummingbot to Gateway running in HTTPS mode, set gateway_use_ssl: true in Hummingbot's conf_client.yml.
Running Gateway
Development vs Production Modes
Gateway can run in one of two modes:
Development Mode (HTTP) - Default
- Started with
--devflag or by default - Exposes HTTP (unencrypted) REST endpoints
- Interactive Swagger docs at http://localhost:15888/docs
- Shows 🔴 indicator in logs
- Compatible with Hummingbot when
gateway_use_ssl: falseinconf_client.yml
Production Mode (HTTPS) - Optional
- Started without
--devflag - Exposes HTTPS (encrypted) REST endpoints
- Requires SSL certificates
- Shows 🟢 indicator in logs
- Compatible with Hummingbot when
gateway_use_ssl: trueinconf_client.yml
Note
HTTPS is no longer required to connect to Hummingbot. By default, both Gateway and Hummingbot are configured to use HTTP for easier setup. You can change the gateway_use_ssl setting in Hummingbot's conf_client.yml to switch between HTTP and HTTPS modes.
Development Mode (Default)
For development mode (HTTP), which is now the default and works with Hummingbot:
Or simply:
The passphrase is required for endpoints that handle wallet operations.
If the server has started successfully, you should see:
bigint: Failed to load bindings, pure JS will be used (try npm run rebuild?)

╔██████╗  █████╗ ████████╗███████╗██╗    ██╗ █████╗ ██╗   ██╗
██╔════╝ ██╔══██╗╚══██╔══╝██╔════╝██║    ██║██╔══██╗╚██╗ ██╔╝
██║  ███╗███████║   ██║   █████╗  ██║ █╗ ██║███████║ ╚████╔╝
██║   ██║██╔══██║   ██║   ██╔══╝  ██║███╗██║██╔══██║  ╚██╔╝
╚██████╔╝██║  ██║   ██║   ███████╗╚███╔███╔╝██║  ██║   ██║
 ╚═════╝ ╚═╝  ╚═╝   ╚═╝   ╚══════╝ ╚══╝╚══╝ ╚═╝  ╚═╝   ╚═╝
2025-04-04 10:09:59 | info |    ⚡️ Gateway version 2.8.0 starting at http://localhost:15888
2025-04-04 10:09:59 | info |    Checking for processes using port 15888...
2025-04-04 10:09:59 | info |    No process found using port 15888
2025-04-04 10:09:59 | info |    🔴 Running in development mode with (unsafe!) HTTP endpoints
2025-04-04 10:09:59 | info |    Read token file from conf/lists/solana.json, content length: 619791
2025-04-04 10:09:59 | info |    Parsed token count: 3859
2025-04-04 10:09:59 | info |    Loaded 3859 tokens for mainnet-beta
2025-04-04 10:09:59 | info |    📓 Documentation available at http://localhost:15888/docs
Production Mode (Optional)
For production mode (HTTPS), which requires SSL certificates:
- Ensure SSL certificates are properly configured (see "Optional: Generate Certificates" section above)
- Set
gateway_use_ssl: truein Hummingbot'sconf_client.yml - Run Gateway without the
--devflag:
If the server has started successfully, you should see:
bigint: Failed to load bindings, pure JS will be used (try npm run rebuild?)

╔██████╗  █████╗ ████████╗███████╗██╗    ██╗ █████╗ ██╗   ██╗
██╔════╝ ██╔══██╗╚══██╔══╝██╔════╝██║    ██║██╔══██╗╚██╗ ██╔╝
██║  ███╗███████║   ██║   █████╗  ██║ █╗ ██║███████║ ╚████╔╝
██║   ██║██╔══██║   ██║   ██╔══╝  ██║███╗██║██╔══██║  ╚██╔╝
╚██████╔╝██║  ██║   ██║   ███████╗╚███╔███╔╝██║  ██║   ██║
 ╚═════╝ ╚═╝  ╚═╝   ╚═╝   ╚══════╝ ╚══╝╚══╝ ╚═╝  ╚═╝   ╚═╝
2025-04-04 10:12:32 | info |    ⚡️ Gateway version 2.8.0 starting at https://localhost:15888
2025-04-04 10:12:32 | info |    Checking for processes using port 15888...
2025-04-04 10:12:32 | info |    No process found using port 15888
2025-04-04 10:12:32 | info |    🟢 Running in secured mode with behind HTTPS endpoints
2025-04-04 10:12:33 | info |    Read token file from conf/lists/solana.json, content length: 619791
2025-04-04 10:12:33 | info |    Parsed token count: 3859
2025-04-04 10:12:33 | info |    Loaded 3859 tokens for mainnet-beta
2025-04-04 10:12:33 | info |    📓 Documentation available at https://localhost:15888/docs
Connecting to Hummingbot
Once Gateway is running, go back to your Hummingbot client or restart it if you have exited. In the upper right corner, you should see GATEWAY: 🟢 ONLINE if your Hummingbot client is successfully connected to Gateway.
If you see GATEWAY: OFFLINE, check that:
- Gateway is running on port 15888
- The
gateway_use_sslsetting in Hummingbot'sconf_client.ymlmatches your Gateway mode (false for HTTP, true for HTTPS) - If using HTTPS, certificates are properly configured in both Gateway and Hummingbot
Interactive Swagger Docs
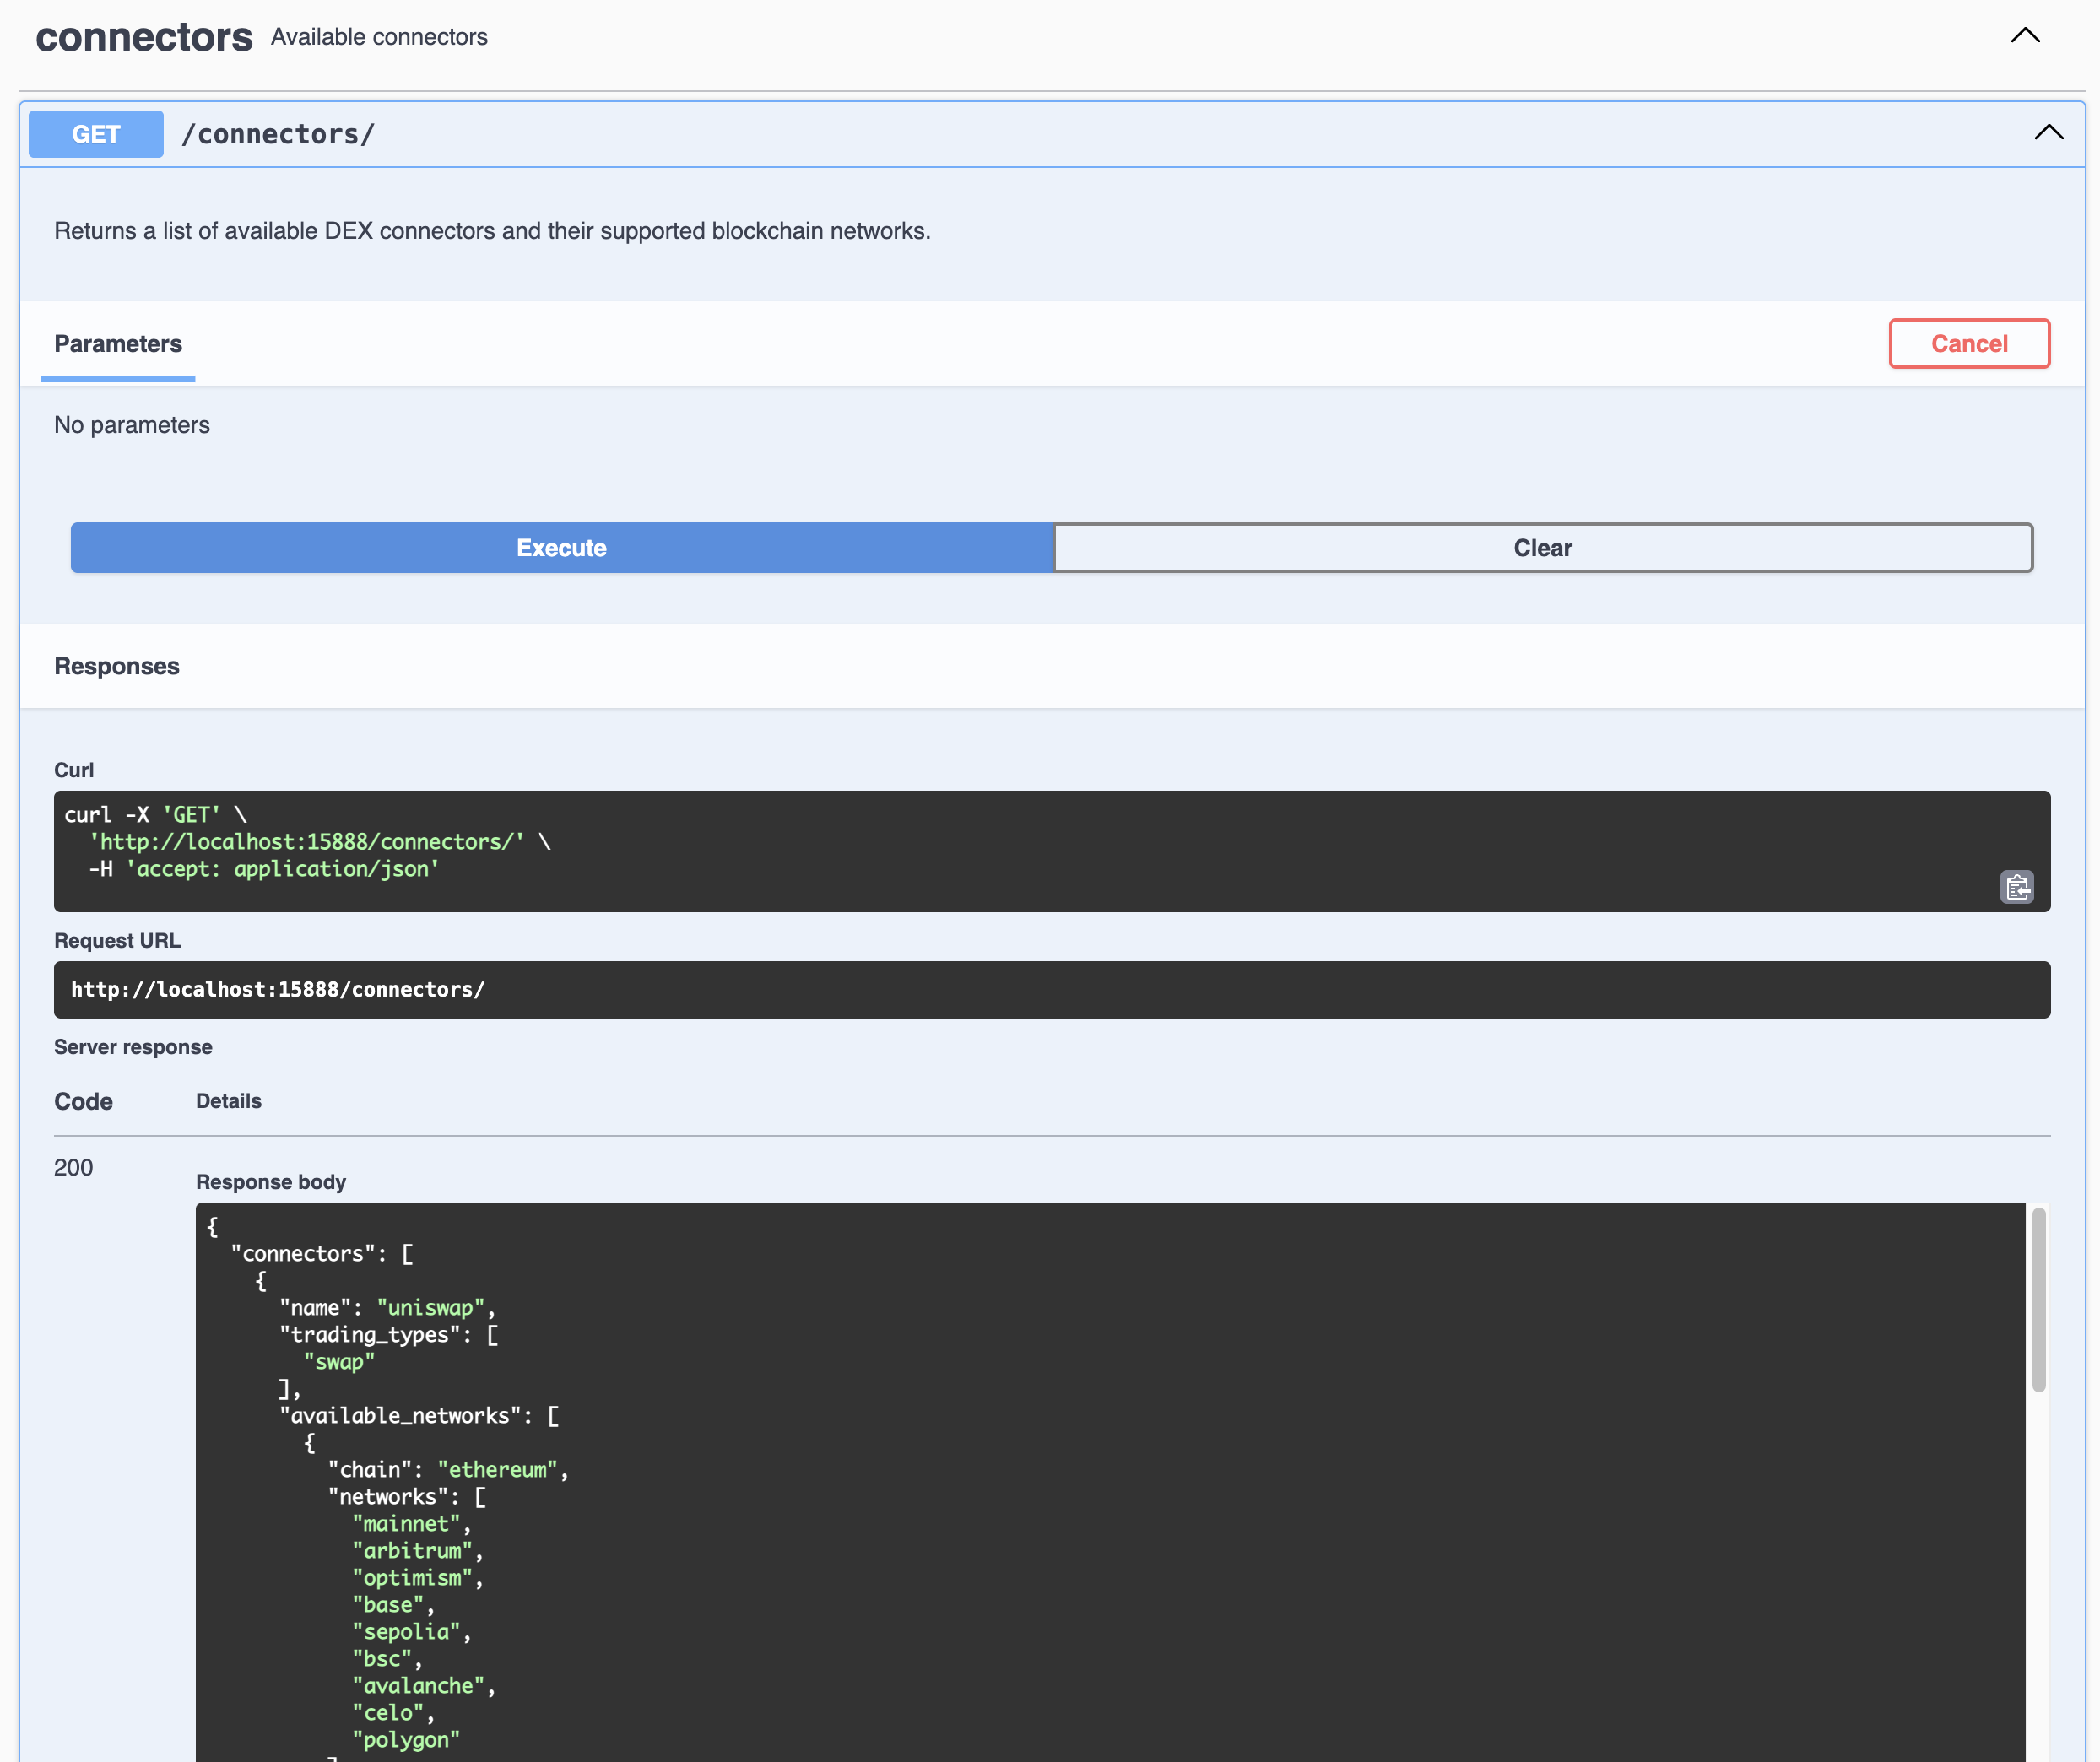
Gateway provides interactive API documentation through Swagger UI when running in development mode. This interface allows you to:
- Browse all available API endpoints
- Test API calls directly from your browser
- View request/response schemas
- Execute live API calls
To access the Swagger documentation:
- Start Gateway in development mode using
pnpm start --passphrase=<PASSPHRASE> --dev - Open your browser and navigate to http://localhost:15888/docs
- You'll see the Swagger UI interface with all available endpoints grouped by category
Each endpoint in the documentation displays detailed information (method, path, description, parameters, request/response examples) and allows you to test API calls directly by filling in parameters and viewing the server's response.
The documentation is automatically generated from the Gateway route files, ensuring it's always up to date with the latest API changes.